
I wanted to share a tutorial for my wonderful followers!
It’s Halloween and anything is possible. I made this fun pumpkin-like plant that has come to life and is hungry.This one is a little fussy, but still fun to make.

Here are all the materials and tools you will need:
Materials:
Sculpy souffle - 6033 pumpkin (Or any orange polymer clay) I like this particular clay because it is not sticky and is just the right color when baked. If you use a different one, bake a sample first because it may change color.
Polymer clay - brown and green
Sculpy translucent liquid
Toothpick
Thin wire
Small pot
Floral foam
Tacky Glue
Wood glue
Tile
Acrylic paint - Bright orange, brown, bright green
Super Glue
Gloss varnish
Steeped tea
Foam tray
Paper
Yellow crepe paper
Tools:
Clay blade
large and small ball stylus tool
XACTO knife
Foam sculpting tool
Small knitting needle
Needle tool
Spatula
Flower hole punch
Small paint brush
Ruler
Wire cutters
Tweezers
First, knead the clay to get it soft and warm.


Wrap it over the top of your large ball stylus tool.


Use your XACTO knife to cut the teeth so the longest tip of them is at the halfway point of the ball.
Leave the back straight and push it down a little so the cut is not abrupt.


Use the foam sculpting tool to smooth out the teeth where you cut them.
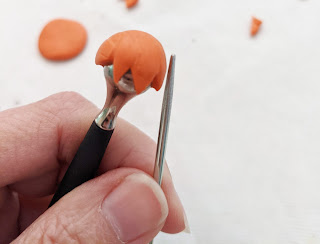
Draw light indent with the knitting needle so they start in the teeth crease and go to the back. Then make them more prominent with the foam tool.
Slowly wiggle the half pumpkin off the ball stylus.

Repeat again for the other half.

Lay both on wax paper or a tile and thin the backs so you can merge them together and smooth them out with the foam tool.
Use the smaller ball stylus to blend the inside so it stays together. Be careful not to flatten the pumpkin. Don’t press too hard.


Press down a dot of brown clay and use the knitting needle to touch up the edges all the way around. Press into the clay and pull away on the surface.


Use your blade to lift and place it on the back of the pumpkin then press your needle tool through the center to make a hole for your wire.
Cut 4-5 pieces of wire. Twist the longest 2 together.

Then twist in one to the same height. This will be for the flower.
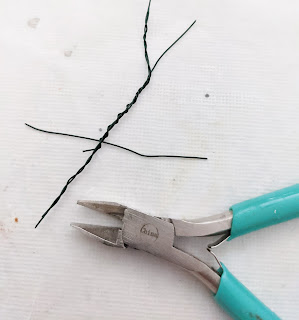
Twist on another lower and then another lower than that one.

Place it in your post to determine where to cut the base of it.

Warm up and roll a tube of brown clay and then flatten it and start wrapping it around the thickest part of the wire stem. Leave the very tip exposed.


Sculpt in some lines to look like a vine.

Slip it in the hole on the back of the pumpkin and blend the stem clay into the back.

Be sure it’s in a good shape and bake the head and stem for only 10 minutes at about 240F.
Chop up lots of tiny pieces of orange clay and mix with the Sculpy translucent liquid using a toothpick.


After the pumpkin has cooled, Flatten the wire from the stem that is inside.


Fill it with the mixture. Spread it flat inside to cover the inside of the mouth.
Bake the head and stem following the manufacturer’s temperature directions for 10 minutes.


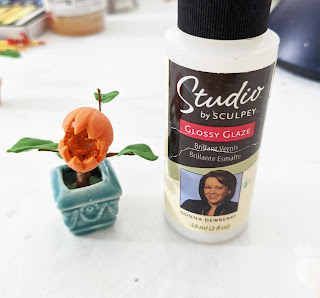
Pour wood glue or Tacky Glue in your pot and push in some floral foam.

Press some green clay on a tile very thin and shape it like a pumpkin leaf or similar. This is a fantasy plant so you have some freedom.


Scrape up each leaf with your clay knife and shape it with your fingers and then make a veins with the knitting needle. Lay on crumpled foil to bake them. I use the foil when I want to be sure the tile doesn't leave a shiny surface on the clay that touches it while baking.

Run some Tacky Glue along the wire branches and place in front of a fan. Keep an eye on it to be sure it doesn’t bubble. Let dry.


Paint the entire stem brown.

Paint the inside of the pumpkin and along the edges of the teeth in a very bright orange.


Push it in the foam to be sure it is at an angle where your pot won't tip over with the weight of the pumpkin.

Take it out and pour some glue in the hole and press it back in. Let it set.

Bend and shape the stems where you want them and put a small dot of Super Glue on the stems and place on the leaves with tweezers.

Paint inside the mouth with a glossy varnish.

Paint some bright green on the leaves and blot it off with your fingers.
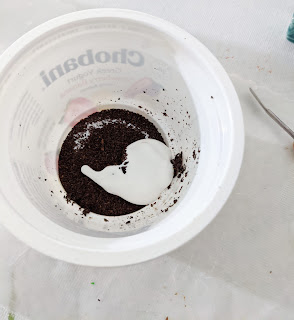
Mix some steeped tea and white glue.

Push the mixture into the pot. Let it dry.

Put paper on either side of the yellow crepe paper and punch out a flower. The paper keeps the thin crepe paper safe while in the punch.


While the crepe paper is still stuck to the regular paper, push a needle tool through the center.

Separate the papers.
Use a small ball stylus tool to curl up all the petals.
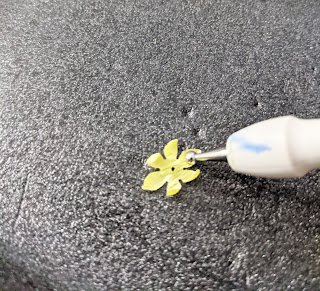
Then flip it over and rub the center. You may have to press the needle tool through the hole again.

Put a dot of white glue in the top stem and push on the flower with tweezers.
Mix some watered down orange paint and put it on the center of the flow so it bleeds through.
You're done!!


0 comments:
Post a Comment