Saturday, November 20, 2021

Making a room box


Let’s get back to the room box supplied by Hobby Builders Supply!


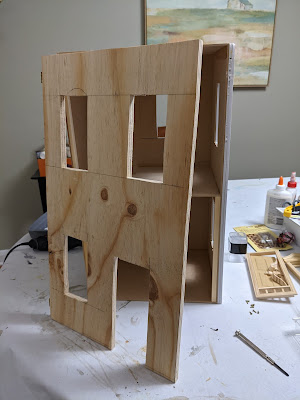
I added foam core to the two sides that will have windows so the walls will be thick enough. I turned the downstairs side door into a window that is now centered under the upstairs side window.


I moved the upstairs back window over a little because I will be making an old fashioned motor working elevator there. I also cut off the back piece of the floor hole because the elevator will need to be flush against 2 walls.


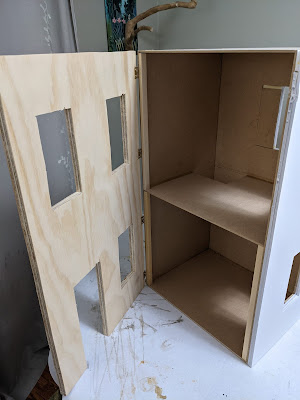
The front opening wall was cut from light weight plywood. I added hinges by first drilling small holes and then screwing on the hinges on the plywood then attached the hinges to the room box. 


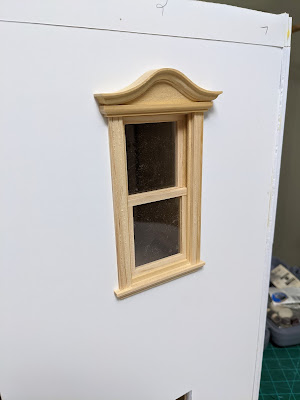
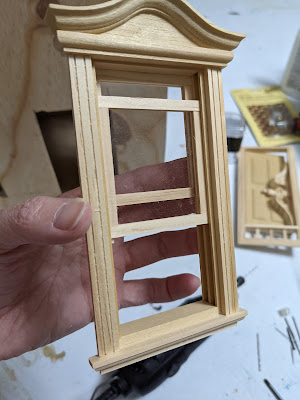
Hobby Builders Supply www.miniatures.com has these beautiful working windows. I love the style and think they will definitely add something special to this build! Get windows here!


When I am planning a build I have to think about my budget. I always splurge on a few select things and then make the rest myself. For this build I wanted the windows and door to be extra special. Getting these Bonnnet Pediment windows actually made me even more excited to see the finished house!


I wanted this small house to have a stylish, romantic touch. Having these windows and a door pediment adds curves and a softness to the build. I will also be adding a curved Mansard roof with a small attic. I designed a Mansard roof on my Kinfeld because I love how the curve adds style an a softness to the house.


The door pediment was from Hobby Builders Supply as well: Single Deerfield Door Pediment. I meant to order the Deerfield Pediment #7072 because it was a better fit to the width of the door I have, but no worries, I can add a decorative width to each side of the door on the front of the house.


I have so many fun ideas for this build I can’t wait to continue! I have decided to tackle the exterior first then the inside. So next up is the facade and painting the windows and doors!


Tuesday, November 16, 2021

Felting tiny mice

Hey everyone! I hope you are all having a nice fall season so far. I got swept into the wonderful world of felting. Like I needed another creative interest, right? Oh well, life is short so why not do whatever you love to do.

I made these guys so far. The tan one in the sled was my 2nd attempt. I can see him in a top hat!


This little guy was my third attempt...Awe I love him!


Here he is showing you the felting needle. Basically you stab the felt over and over on the burlap and rice pillow as it sticks to itself. Sorry, my portrait filter is blurring and deleting parts of the needle.

Then my boyfriend (who owns an auto shop) wanted one for his service counter so I made Bud! He wants to see the reaction from his customers and if he will sell.


I still have some fine tuning to do as I continue to make them. It's fun watching them come to life.

This started because I wanted to make some fox to live in the half-inch scale Jasmine house that I have been sharing continuous tutorials for in American Miniaturist magazine. So here they are so far. They still need eyes, noses, tails and clothes.


That's what I have been up to as well as the room box, which I will post progress on very soon. 


Friday, November 5, 2021

Room box


Hobby Builders Supply www.miniatures.com sent me this fabulous room box kit! So what would you like to see it become? Once decided, based on consensus, I will share step-by-step on my blog! Looking forward to reading your ideas. Have a great weekend!


Wednesday, November 3, 2021

Miniature dollhouse step stool


My little aspiring witch needed to be able to reach her potion hutch and this stepping stool will do the trick for her.


 Trace the patterns onto basswood and cut them out with your knife. Go slow so you don’t split the wood.


Sand all the edges with fine sandpaper. Hold the two sides together to be sure you sand the edges smooth in identical shapes. Sand the bottom front of the step down so it looks worn as well.  Erase any pencil lines that may still be there.

Sand the top step so the inside top is worn from use and round the corners a bit.

Paint all parts of the step side pieces and the tops of all the other pieces. Sand them and paint again. This is to get a nice smooth finish because once put together it is harder to sand in the corners.

 Put some wood glue with a toothpick on the inside back of the two side pieces as shown. Press them against the back piece until they are tacky. Stand up to be sure the stool sits evenly on your table.

 Apply glue with a toothpick to the sides of the bottom step and slide in between the step stool sides, be sure to have the sanded down ‘worn’ edge facing up and in front. Check that it is even and let dry.


Dry fit the bottom step back piece and trim off the top if needed. It should be flush to the top of the side pieces. Apply glue with a toothpick to the sides of the bottom step back and slid it in.


Apply glue all around the top and press on the top step so it is flush to the back. Glue on the bottom step lip. Let it all dry.

Give it another coat of paint to fill in any gaps and sand carefully. Let dry.


Make a wash of water with dark brown paint and apply all over to give the step stool an aged look.  Then carefully dab on some brown paint along all the edges with a small brush for a nice shabby effect.


Once you are happy with the finish you can add a design to it with water transfers paper or hand-paint one. I used a brown colored pencil. 

Finally, apply a satin or matt varnish to protect the paint.


Have fun with this and make it your own! I would love to see your finished piece.