Saturday, January 29, 2022

Dollhouse roof


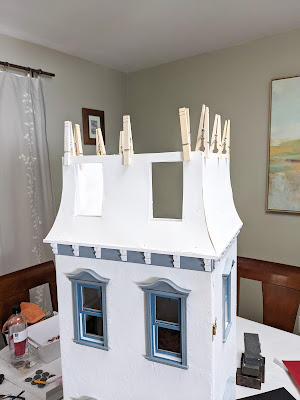
Back when I made The Kinfeld, I shared how I built a Mansard roof. Click HERE to see. 


I drew out the top floor and marked out room for the braces.


I built the walls and cut out the windows.


I cut out and installed all of the braces from foam board.
Then traced the curve onto poster board.


Holding up poster board and tracing where to cut it to shape.


Glue and pins (pushed all the way in) hold the poster board to the braces behind.


After I added the 'stucco' to the walls I traced where the window holes would be on the front poster board piece. I am using a spackle knife to mark a level line from the window hole out to the curve of the mansard roof.


Then I used a triangle to cut out the windows so they are straight according to the rough tracing.


All the sides are on and drying. Clothes pins hold the poster board to the top while the glue cures.


I have made the windows. I should have made them lower, but wasn't 100% focused that day. Nothing some beautiful window boxes can't fix!


I covered the roof with black construction paper.

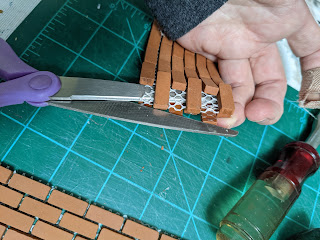
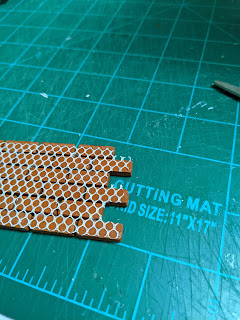
I decided to use the same technique for the roof shingles as well. Click HERE for my shingle tutorial.


This project is just about finished. On the list is a few touch ups with paint and the installation of an old fashioned house elevator/electric. This was made to be a way to display a collection of miniatures more so than to mimic a realistic home.


Parish Bleau from BleausCustomWoodWork supplied that gorgeous herringbone floor kit!


The steps and garden (to come) can be moved away to open the front.


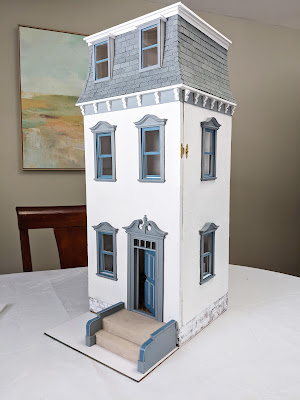
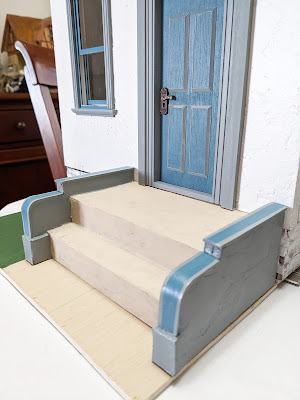
The beautiful windows and door embellishment really make it feel grand and charming at the same time. Wire electric can easily be installed and there is a cubby hole on the outside base to store the plug strip. Vines on the outside will easily hide the white wires.


After my boyfriend makes the elevator motor, I will make the actual elevator and install it. He works long hours so I’m not sure when it will be. He wants to 3D print a casing for it too. Until then, I will continue on and finish up my French stone cottage!


This townhouse project started when Hobby Builders Supply www.miniatures.com sent me a double room box kit!

Visit that post HERE


Tuesday, January 18, 2022

Dollhouse porch step


I was ready to make the porch steps for the double decker room box so first I took measurements.


Then I decided on the design I wanted for the porch sides.

The width of the sides would be the thickness of two pieces of foam board.


Next, I took the initial measurements of the entire width of the porch and subtracted the thickness of the 2 sides walls to determine the porch ‘concrete’ area.


I cut the porch ‘concrete’ area first.


Then the height from the top of the porch to the ‘ground’, for the back of the entire porch's structure and the back of the step.


Then I determined the measurement of the step top and the step base to the ground. 


I dry fit the porch and laid down the step and marked the foam board where the sides would end.


I drew the shape onto the foam board. But somehow I cut it too short! So I glued some wood to the bottom of the sides to make up the difference. 


Here the two sides are glued to the back and I have cut braces to glue in the corners for extra support. Then I glued the front with braces and glued on the top of the porch. Once they dried, I glued on the step. I cut two pieces of mat board and glued them on the inside walls, butted against the step and around the front.


I used Fun Foam to make the curve over the top of the sides and glued it down with wood glue. 


Once dry, I painted everything.


I will be adding a garden on the sides but first I need to make the roof!


Thursday, January 6, 2022

Dollhouse brick foundation

I wanted some distressed brick at the base of my room box and Hobby Builders Supply hooked me up!

This is the product I am using…Common Joint Pattern Brick Sheet

In the past I have made brick from scratch using PaperClay, foam or wood filler. This time I thought I would go back to a product I used when I first started miniatures many, many years ago.


These brick sheets are very easy to work with. The clay bricks are glued to the mesh, but can be easily removed if needed. The mesh can be cut with scissors.
To start with, I built a wood base for my room box then measured the height and cut strips of the brick. Starting with one side at a time, I lined up the strips and figured out how the corners would meet.

First, I just folded the brick mesh over a corner and let the mesh peel away from the brick. Then I cut the mesh around the brick. Next, I lined up my 2nd strip to fit into the corner like a puzzle and trimmed away the mesh.


I held both strips in place and marked them with a pencil where they needed to meet to be flush.


Then I transferred the marks I drew on the front to the back of the bricks. I flipped over the strip so it was front-side-down on my cutting board.


Line up the chisel just behind that line. (When the chisel is hit with the hammer the brick will break at an angle. This way when you flip it over your break will be closer to the line you drew.)
Note: If you have a saw that cuts stone or ceramic, you can use that to get a precise cut. I am making a distress base so I wasn’t worried about perfection.

Some corners will require you cut individual bricks to fill in holes at the corners. If you're using a chisel you need to cut a long strip of meshed brick and cut the end brick then peel it off. Otherwise your usable brick piece will fly away!
Glue down your pieces with wood glue. I glued one side and let it set for 15 minutes, then flipped the house over and glued the next side and so on.
I also got some mortar mix from Hobby Builders Supply. You can find it HERE
Mix it in a bowl with water until it is slightly runny. Here is the trick…it needs to be a little more runny than what you are comfortable with because once it contacts the bricks they suck up all the water very quickly and you will have trouble getting the mortar in the cracks.
Spatula it on and press it down immediately. I used an old silicone spatula because it has some flex to it and helps get the motor into the cracks. Do a small section at a time. Once the mortar has seized up, use a metal spatula to cut the excess away and put it back into your bowl. Just scrape it flat and cut into the mortar. You will be adding more water, adding more mortar powder in your bowl as you go. Just a little at a time so you don’t waste.
Run a damp sponge over each area to clean up any excess and rinse the sponge under the faucet into a bowl. (Don’t pour the water down your drain! When you are finished or the bowl is full, dump it out the window or walk it outside).
I ran my finger over the brick after the sponge to press any extra mortar into the cracks. Let it dry overnight.

I wanted an old distressed paint job on mine so I brushed some white craft paint over it with a medium brush, careful not to cover everything and to leave some red brick showing. Let it dry.

Then I used an old small brush and dabbed some thick paint blobs over some of the brick that was all white, still being sure to leave some brick uncovered.
TIP:Keep your old brushes. They really do come in handy for certain textures.

Next up, I will be making the porch/steps…